Setting up a Dual Battery System is Easy
How many times have you been out camping and in the morning you wake up to find out that your starting battery is dead because you left a light on or played your car stereo for too long the night before?
Not having sufficient battery power can leave you stranded and can make it impossible to enjoy lights, music or even cold drinks and food while on a van trip.
The good thing is that you can easily overcome this problem by installing a simple dual battery system in your van.
A dual battery system can be used to power various accessories including thermoelectric coolers, interior and exterior lighting, stereos, televisions and many other useful electrical components.
While setting up a dual battery system may sound like a big task, it’s actually not that difficult. You can set up a simple system in a few hours with a few basic tools and the right equipment.
The Basics:
Dual battery systems generally consist of a deep cycle battery, a battery box, voltage sensitive solenoid, 15-25 feet of heavy gauge (8 gauge or heavier) wire and a couple of fuses. It is also handy to add a battery gauge as well so you can access the strength of your auxiliary battery.
You will probably need a screw driver, drill, basic wrench set and wire cutters to complete the process.
The Equipment:
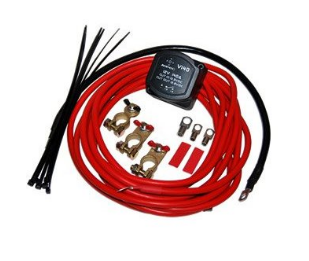
You can find a variety of ready made dual battery systems that include everything but the battery. One great system is the Jay Corp Dual Battery Isolation Kit with Voltage Sensitive Relay . The JayCorp Dual Battery System comes with a smart solenoid that automatically separates the starting battery from the auxiliary battery once it drops to 12.8 volts. This means that there are no manual switches to flip and ensures that you never forget and drain your starting battery.
There are other pre-built systems such as the T-MAX Dual Battery System and the WARN Dual Battery Control Kit
. The T-Max System doesn’t include a smart solenoid but uses a manual switch instead so you have to remember to turn it on and off. They call that an “idiot switch” because if you forget to turn it off you’ll feel like an idiot when your battery is dead in the morning.
The good thing about these pre-built systems is that they generally include everything you need to get started except the deep cycle battery.
If you’re looking to piece things together yourself there are some great options out there for smart voltage sensitive relays. The one that I use in my van (and it works great) is the WirthCo 100 Amp Battery Isolator. This smart solenoid disconnects your starting battery from the system when it drops to 12.8 volts and makes sure it never dies. Another feature that I love about this solenoid is that it has an override button that allows you to start your van from it in the event that your starting battery is dead or you just need a little more juice. The Wirthco also comes in higher amp models such as the WirthCo 150 Amp Battery Isolator
.
Once you’ve selected a battery isolator solenoid you need to purchase 15-25 feet of 4 Gauge Power Cable, an Inline Fuse
and battery terminal connectors
.
You might also consider a basic battery voltage gauge so you can track the charge of your auxiliary battery.
The last and most important piece of equipment you’ll need for your dual battery system is a quality deep cycle battery. It’s important to use a deep cycle battery because deep cycle batteries are designed to be run down and recharged over and over without loosing their ability to hold a charge.
Deep cycle batteries also come in sealed and non-sealed varieties. If your battery is going to be inside your van it needs to be a sealed AGM style battery. Non-sealed batteries give of hydrogen gas when they are being charged and can be dangerous to have in poorly ventilated areas.
There are many different brands to choose from and things to consider when choosing a deep cycle battery. One of the main things to consider is the amp hour rating of the battery. Basically, the more amp hours in the battery the longer it will last. Deep cycle batteries are available in ranges of 55-200 amp hours. The more amp hours, the larger the battery size and the heavier they are. Another important thing to think about is the warranty that comes with the battery. Popular companies like Exide and Optima often have excellent warranties.
A few good options for your dual battery system are the Vmax Tanks AGM Deep Cycle 125 amp hour battery and the Exide XMC-31 MEGACYCLE AGM battery
but if you shop around a bit you’ll find the right battery for you.
Depending on where your battery is mounted you might also want to consider a Battery Box as well.
Installing the Dual Battery System:
Now that you have all of your components purchased irt’s time to put it all together and make it work. Don’t worry, it’s easy!
Step 1- Disconnect your starting battery from the system by removing the positive wire from the battery terminal.
Step 2- Figure out where your auxiliary battery will be mounted. Under the hood is best if you have room. The less cable you have between your solenoid and your auxiliary battery the less voltage drop you’ll get and the more effective your system will be.
Step 3- Mount your smart solenoid in the engine compartment. Preferably close to your starting battery. The easiest way to do this is with some industrial grade Velcro. When you mount your solenoid you can run a ground wire from the solenoid to the frame and secure it with a screw. Often times there are pre-existing screws that can double as a ground wire mount. Make sure you remove any paint or grease to ensure a solid ground.
Step 4- Run your 4-8 gauge power wire from the correct positive terminal on your smart solenoid to the auxiliary battery. You won’t connect it to the positive terminal on your auxiliary battery until the very end though. Sometimes you’ll need to drill a small hole in the firewall or the floorboard of your van to accomplish this task. It sounds difficult but it’s really easy and safe. Just make sure you use a large enough drill bit and then insulate the freshly drilled hole with a rubber grommet to protect the sharp edges from abrading your power wire.
Step 5- Install an in-line fuse (usually 60-80 amp) in your power wire about 12 inches from auxiliary battery. This will ensure that if something shorts out your van won’t go up in flames. Very important.
Step 6- Install ground wire from your auxiliary battery to a well grounded location. Make sure that your ground wire is attached to something solid like the frame or chassis. I was able to attach mine to one of the bolts that mounts my drivers seat to the floor of my van. this worked good for me but may not work in all applications.
Step 7- Connect power wire from proper terminal of smart solenoid to starting battery. Connect power wire from proper terminal of smart solenoid to auxiliary battery.
Step 8- Seal or tape all open or exposed connections and reconnect your starting batteries main terminals and your done with your dual battery system!
Your batteries should now be charging when your van is running and isolated when it is turned off. If you want, you can add a battery voltage gauge to your auxiliary battery so you can see how well it is charged.
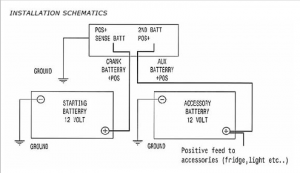
Below is a simple diagram showing how a basic setup would look.